My camera image is displayed backwards (what’s on the right shows up on the left side of the screen).
Most versions of the CVD Series displays have the ability, through the on screen installers menu, to change the camera image from mirror to
normal or vice versa. In addition several camera models are equipped with image reversal switches. Areas to look at include:
| |||
|---|---|---|---|
| Yes | No | ||
Step 1 |
Is your camera equipped with an image reversal switch? (refer to your camera quick installation guide for switch information) | Go to step 3 |
Go to step 2 |
| Step 2 | Change the current switch setting at the camera. Did this correct your problem? | Done | Go to step 3 |
| Step 3 | Access the installers on screen menu and change the LCD 1 setting by pressing the up ▲ or down ▼ arrow buttons on your remote from where it is currently. Did the image change? Note: When using a multi camera controller there will be LCD 00001 through LCD 00005 settings. This allows each camera position to be changed independently. See additional information below or you Operators Guide for further information regarding your software version.
|
Done | Contact your INTEC Service Rep. They may ask you to return your display for service. |
| Image orientation reversal is not available in display software versions prior to 2.3.0 when used with a single camera controller. | |||
| For single camera controllers using display software version 2.3.0 and newer you can access the Installers Menu by pressing the MENU and ▲ (up arrow) buttons on your remote at the same time. Once you’ve accessed the installers menu keep pressing the menu button until you come to LCD 1 REV NOR. | |||
| For multi camera controller using display software version 2.0.0F or 2.2.0 you can access the Installers Menu by pressing the MENU and CH5 buttons on your remote at the same time. Once you’ve accessed the installers menu keep pressing the menu button until you come to LCD00001 REV NOR. Note: If you’ve changed your camera position names those will be reflected here as well. For example if you changed LCD00001 to REAR the menu will display REAR REV NOR. | |||
| For multi camera controller using display software version 2.3.0 and beyond you can access the Installers Menu by pressing the MENU and ▲ (up arrow) buttons on your remote at the same time. Once you’ve accessed the installers menu press the CH2 button. There you will find LCD00001 through LCD00005 REV NOR. Note: If you’ve changed your camera position names those will be reflected here as well. For example if you changed LCD00001 to REAR the menu will display REAR REV NOR. | |||
The default image setting is REV. To change it when using the CVS100 or CVS102 series controllers press the "Menu" and the "UP" arrow buttons on your remote simultaneously. This gives you access to the installer’s menu. When you've done so continue pressing the Menu button until you see the screen below:
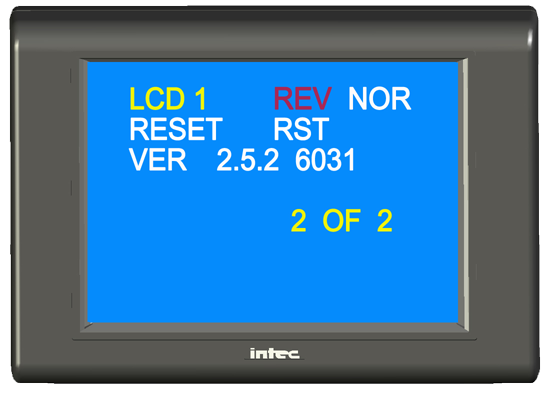
Simply press the "Up" or "Down" arrow button for the desired orientation.
Note: You cannot change the EXT input orientation.
When using the CVS500 series controllers press the "Menu" and the "UP" arrow buttons on your remote simultaneously. This gives you access to the installer’s menu. Next press the "CH2" button and you should see the screen below:
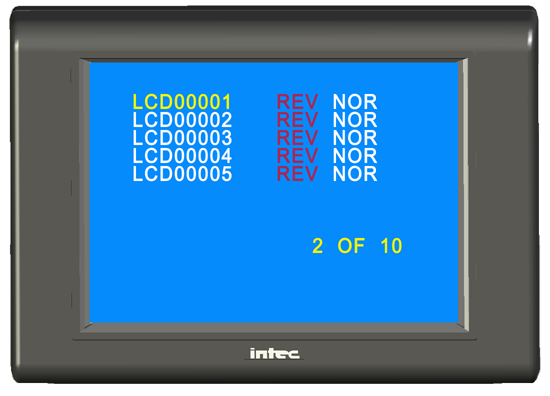
Simply press the "Up" or "Down" arrow button for the desired orientation.
Note: You cannot change the EXT input orientation.